Climbing
Gear Reviews
|
|
Climbing
Gear Reviews |
|||||||
|
||||||||
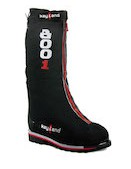
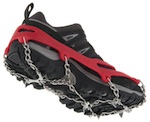
Kahtoola MICROspikes- February 2011
Several different variations on this theme are available from different companies but Kahtoola's MICROspikes seemed to offer everything I needed. That said, they are a bit heavier and more expensive than the popular alternative from Yaktrax. Weighing a little under 1 pound, there are eight metal spikes linked via chain link. This is attached to a strong, stretchable rubber frame that attaches around a shoe or boot. Advertised as a traction device that can fit in a purse or small bag, it is a compact package that fits, more appropriately for this review, in a day pack. I have been using a pair this winter and am very pleased. They slip on very easily over regular trekking shoes, climbing boots or even my huge 8000 meter boots. They have a thin wire toe bail that fits neatly onto the front of a crampon compatible boot making a secure connection. However, if the boot does not have this, no worries since the frame fits snugly over any boot toe. Unlike 12 point crampons, the MICROspikes feel smooth underfoot when on snow but not quite as secure. On rocks, they feel the same as crampons - rough and edgy. But in all cases, they provided that extra traction I needed. Clearly, these are not designed for true climbing, ice climbing or on any extremely steep technical terrain. I did find the toe frame slipped upon aggressive moves so clearly they are not crampon replacements. Also snow clumping is inevitable and requires the random whack to keep the soles clean. I like the Kahtoola's. I feel secure without overdoing it for a hike on snow. While I am not a runner, many love them and use them with normal running shoes. Bottom line: An excellent traction solution when crampons are overkill February 2013 Status Update: Had the links break on one pair but still use them often. Would buy again.
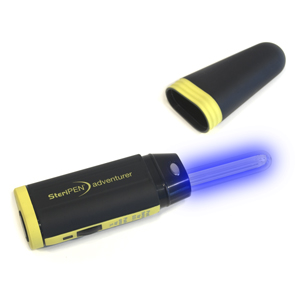
SteriPEN Adventurer- September 2010 -updated
With my REI dividend, I bought one early in 2010 just before a trip to California's Mt. Whitney and a full summer of Colorado 14ers planned. Given how popular these areas have become, it is almost a requirement to filter water regardless of the source, however some would disagree with my view. SteriPEN offers several models and I choose the Adventurer. This second generation model is in the middle of the line and is smaller, faster and cheaper than previous versions. I avoided the top of line Journey with some advanced features due to poor reviews I had read but I have no personal experience with it. The Adventurer is simple to use, once you understand the blinking lights. A simple push of a button starts the cycle, wait for 3 flashes of a tiny green LED and you are ready to go. Simply immerse into a Nalgene type bottle and the white ultraviolet light illuminates. Stir gently and wait for the lamp to go off and your water if ready. Pretty simple. SteriPEN uses ultraviolet light to clean the water. Their marketing material makes this claim: Extensive microbiological and structural testing by independent laboratories across the U.S. and Canada has proven SteriPEN to be safe and effective, confirming the fact that SteriPENâs UV light technology eliminates over 99.9% of bacteria, viruses and protozoa that cause water-borne illness. As a result, SteriPEN has earned the Water Quality Associationâs Gold Seal, certifying that SteriPEN purifies water safely and effectively. As for performance, they state: SteriPEN purifies 16oz. (0.5L) in just 48 seconds; 32oz. (1.0L) in just 90 seconds. All without any pumping, timekeeping, or any added aftertaste or chemical odor. I have now used the Adventurer for 5 months in a variety of conditions and have not changed the batteries. Overall I am pleased. In real world use, I found a couple of tricks. First, I only use clear water bottles, not the colored ones since it makes seeing if the light is on or off much easier. Second, on multi-day trips, I always carry a wide mouth Nalgene with me even if my primary water storage is a bladder since it is virtually impossible to use the SteriPEN in a MSR Dromedary or Camelbak style water bladder. One major benefit of using the SteriPEN is that since it is so light (3.6 ounces) you can always have it with you thus reducing the need for carrying 2 or 3 liters on a long day. Of course, this assumes you are in an area with available water. In addition to backcountry use, I know many people who use it regularly in third word countries on treks and treat all their water even in remote restaurants. You do have to be careful to use somewhat clear water and if it is muddy, pre-filter the larger sediments with a bandanna before using the SteriPEN. I do on occasion become confused with the blinking lights. A flashing red LED means the system is not ready or somehow failed to complete the cycle; I have had this happen from time to time. Also when it does not start up as expected, it introduces doubt in my mind the water has been really treated. But usually I wait a moment and start over and everything works as advertised. For these reason pus the unknown of battery life, I always carry iodine tablets (and extra batteries) with me as the ultimate backup but have never used them since owning a SteriPEN. They have recently introduced a battery free model called the Sidewinder. This operates on the same technology but uses a hand crank to supply power. It screws onto a standard Nalgene style 1L bottle and has the same performance. I have had excellent experience with the Adventurer in high mountain conditions, however it is not designed to work below freezing and REI does post this comment on their site: On occasion, SteriPEN users have reported issues when using their device in water with a very low electrical conductivity, such as water from melted snow or ice. Since late 2008, all SteriPEN models have had their water sensors enhanced by doubling the sensor electrode voltage, thereby increasing electrical current flow in water with low conductivity to allow proper function in snowmelt and even mineral-free distilled water update: I broke my own rule and forgot to take iodine as a back up on Aconcagua. The SteriPen failed to operate just presenting a confusing array of blinking lights. I was able to borrow pills from other members but felt let down. It is now relegated to my luxury list and something I will never count on again. Bottom Line: I like the SteriPEN but cannot count on it. I view it as a luxury item. It is small, simple and fast. I like knowing my water is treated without chemicals and appreciate the maintenance free aspect of the technology - when it works. February 2013 Status Update: Stop using after it let me down. Use iodine now. Not recommended if you are far from home. Consider the Sawyer Squeeze Filter
Black Diamond Trail Shock Trekking Poles - July 2010
Studies have shown there is a measurable reduction on the joint load when using poles and this matches my personal experience. Also, I like having them for additional balance when crossing streams or traversing narrow logs. I reviewed my long time favorite poles from Leki in May 2009 (see below) and made this comment: The length adjustment seems to be the weak part of all trekking poles. A plastic compression joint expands and contracts when twisted thus allowing the two parts of the pole to be adjusted to the correct height - which is to have your forearm parallel to the ground when holding the grip. I have had mixed results with the reliability of this joint but Leki provides a repair kit when the plastic pieces fail. However it is frustrating when you apply pressure at a critical part of a move and the pole collapses into itself. True to form, the joint finally failed, my fourth pair to do this so when I saw the Black Diamond pair on sale at Steep and Cheap, I decided to try them out. The primary difference from the Leki is that BD uses a snap lock system to adjust pole length. This is a simple plastic compression squeeze mechanism that you open and close with a firm thumb push. I have used them extensively for the past several months on climbs of my Colorado 14ers. Overall I am quite pleased. They are stable, stay locked in place and are comfortable in the hand. I like the snap lock feature in that it is easy to operate, even with gloves, and provides a secure feeling that the adjustment will hold under stress. The handles is comfortable, again even with gloves. While heavier than the Leki, the Black Diamond feel more secure to me. And that is critical when moving fast over rough terrain where loosing your balance may mean losing the day. My only complaint thus far is the fabric on the wrist strap is already tearing so check back in a year to see how they hold up but so far, so good. It seems all pole designs have a weak spot but these BD look solid thus far. This is one time when I will trade a bit of weight for reliable performance. Bottom line: A required accessory for anyone looking to save their knees. February 2013 Status Update: Had both poles bend when I put them under stress. The snaps weakened and started to fail. Not very durable but still would recommend them if you can buy on sale.
Big Agnes Seedhouse 2 - July 2010
I looked at many brands and stumbled upon Big Agnes based in Steamboat Springs Colorado. They offer a full line of tents and the Seedhouse Series stood out to me. I bought the Seedhouse 2 a couple of years ago and have used it extensively for my climbing trips in the Colorado Rockies. First the pros. It is incredibly easy to set up, even in windy conditions. The extremely lightweight aluminum poles snap together with an integrated zip cord and 3-way connectors that eliminates mistakes when assembling in rain or dark conditions. Tight plastic snaps attach the tent to the poles, again easy, secure and mistake proof. The rain fly is just as easy to add making a cozy home in a matter of minutes. It is a free standing tent which means stakes are optional and I only use them if I think it will be windy not wanting to return from the summit and look for my tent down slope! The rain fly also creates a roomy vestibule that I use for storing gear or as an early morning kitchen while staying warm in my bag. Also, there are two small mesh floor pockets near the door on both sides for headlamps or midnight snacks. The headroom is excellent for such a small footprint. Being a 3- season tent, the body of the tent is a fine nylon mesh to reduce weight. Of course this prevents it from being warm thus the 3-season specification. However, a heavier nylon rip-stop fly provides the real weather proofing. It is waterproof and ties nicely into the tent itself. I have successfully staked out my Seedhouse in harsh winter-type conditions with snow, heavy rain and winds plus temps below freezing. While not as warm as a double walled tent, it was manageable for a night or two. OK, now the downsides. in very windy conditions, this design style allows dust to enter the tent as well as, umm, wind. So it is critical to stake the fly very close to the tent wall if you are expecting harsh conditions. But the biggest downside is that with lightweight comes a somewhat fragile product. My tent has developed a rip along the door seam. This is disappointing since the tent is solid otherwise especially the strong nylon floor. The Big Agnes is a solid tent that meets 90% of my needs throughout the year. While not designed as a true winter tent, it can be used in some harsh conditions when properly setup. A nice tent for one but a push for two that would exclude any gear inside. Bottom line: A good value for 3 season backpacking trips February 2013 Status Update: Had mesh rip at zipper seam through normal use. Still use but might look at lighter, alternative tents.
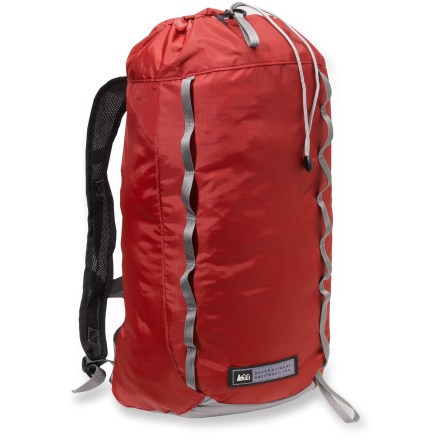
REI Flash18 Pack- July 2010
On a recent visit to my local REI, I strolled through the pack department and saw what for lack of a better description was a stuff sack with mesh shoulder straps. They call it the Flash Pack. It is a deceptively simple design. Basically a ripstop nylon sack with minimal shoulder straps. It closes tightly with a clever drawstring system and small flap to keep everything inside. It also features a hydration sleeve plus two small inside mesh pockets for sunscreen or a wallet. I first used it as a stuff sack for my sleeping bag and it worked well enough until on one summit, I was hit by a torrential rain. My little REI pack was thoroughly drenched, and so was I. Almost everything inside my little pack was drenched as well. So when it came time to pack out, I had lost my dry stuff sack. So now I put a small plastic trash bag inside the pack to keep my essential contents dry. Also, my sleeping bag is back to it's own stuff sack. Kind of defeats the simplicity angle, I know. It might work as a tent stuff sack since the tent might be wet already however. I do use the inside hydration sleeve for my MSR Dromedary 3 liter water bladder. A tiny thru hole allows easy access for the tube plus small elastic bands on the shoulder straps keep the tube near my chest. I also strap my camera to the other shoulder strap for easy access. I am impressed that such tiny straps support all this extra load. I also appreciate the daisy chain on the outside of the pack. While I would never use it for heavy tools such as crampons or an ice axe, I do attach my SPOT locater to them via a small carabineer. The sternum strap is effective as is a tiny waste strap. However, I never carry more than 10 pounds with most of that being water that is drawn down as the day progresses. There is an emergency whistle built into the sternum buckle but I think it is not loud enough to replace a real one. So this guy is now on my 10 essentials list for every trip, big and small. It is a great way to carry a few items for a quick stroll or a day long hike is good conditions. A nice design by the REI team with no fluff. Bottom line: An inexpensive day pack perfect if only carrying the 10 essentials for a quick summit run or airline flight February 2013 Status Update: Use occasionally. Found it to be a bit uncomfortable. Also, not waterproof so big problem if it rains. Use rarely these days.:
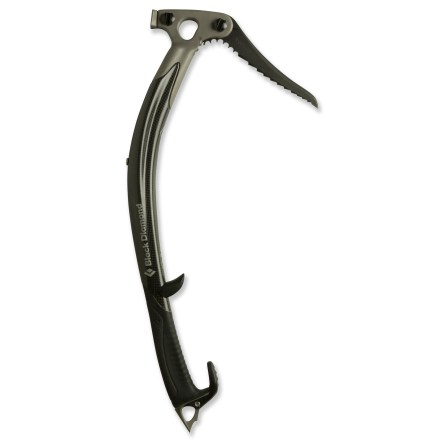
Black Diamond Cobra Ice Tools - February 2010
The Cobras are a work of art, and engineering. With the shaft made from carbon fiber, it is lightweight and solid. Most of the weight is in the steel head thus making each swing feel easy and natural - just a flick of the wrist was often all it took to place a good pick. The curved shaft provides excellent clearance over bulges, offered excellent reach and I never smashed my knuckles. There is virtually no vibration. I appreciated the rubber grip fabricated into the lower part of the shaft. Some complain that the grip is too fat for small hands, which I have, but that was a not a problem for me. I wore my Hestra Alpine Pro leather gloves. The fang on the bottom supported my hand well and when I did need to move up to the strike to pull out of a tight pick, it worked well but was tad tight with heavy gloves. They do not come with a leash and this was my first time climbing extensively leashless. I liked the freedom to switch hands, shake out instantly and the lack of clutter. However it was sometimes unsettling on WI4+ half way up a 150 ft climb, but I got more and more comfortable with not having them. So why would someone like me buy such an expensive tool? Simply put, I focus on the long term and quality knowing I will not replace these for years and always have a great tool supporting my life. Bottom line: An expensive tool that makes ice all the more enjoyable and helps you go beyond what you thought. February 2013 Status Update: Love, love, love em. Did buy leashes for Alpamayo climb when if I dropped one, it was life and death. Highly recommended.
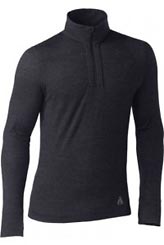
First Ascent Merino Wool Base Layer- February 2010
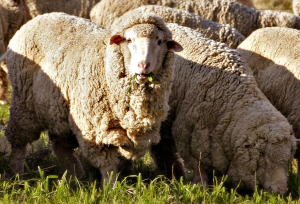
If you are a regular visitor to my website, you know I love sheep! OK, not actually sheep but their wool and specifically wool from merino sheep. It is the only layer that goes next to my skin these days on short winter day climbs or multi- expeditions. Basically, it is soft, comfortable and does not stink up the tent after a long day (or month). There are many companies that sell merino wool base layers and, honestly, there is not a lot of difference. My old bottoms from Arc'Teryx had some holes in the ankles from my own clumsiness so I want to buy a new pair and this time looked to try out Eddie Bayer's First Ascent line. I ordered a top and bottom online and used them for several days while ice climbing in Ouray and then in a bone chilling -13F climb of a Colorado 14er, Quandary Peak. I was pleased. The fabric was soft and met my expectations of New Zealand merino wool. The First Ascent layers were well made with flat seams and nothing poking into my skin in "awkward" places. It wicked well and was dry at the end of some extensive ice climbs as the sun bore down. I liked the top's features of thumb holes and the solid zipper for ventilation and the high neck for cold breezes. In the freezer on Quandary, I felt warm with only one additional layer on my legs and torso - Patagonia Guide Pants and Patagonia Micropuff Jacket. I was pleasantly surprised at how well it kept my own warmth. Bottom line: Well made base layers at market prices for merino wool. February 2013 Status Update: I still use this same pair. Shame on FA for discontinuing them. Recently bought Icebreaker and really like their quality.
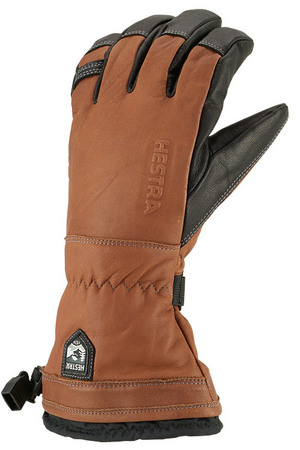
Hestra Alpine Pro Gloves - February 2010
The Swedish company has a stellar reputation for quality gloves used by athletes in multiple sports. I received their Army Gauntlet Glove as a Christmas gift and have been using it on a few climbs including ice climbing in Ouray and a couple of winter climbs on my Colorado 14ers in extremely harsh conditions where I saw temps below zero and winds over 40 m.p.h. My first comment is that these are beautifully made - the craftsmanship is excellent and I think they will last for years. They come with a wool pile liner that is a bit weak. It is attached with Velcro at the entrance to the glove but I kept finding that the fingers got out of alignment and I had difficultly getting my little fingers to align with the outer glove - a real hassle to correct since you have to remove the liner and reassemble everything. On the positive side, they were warm enough during ice climbing and being removable, I could dry them out at night from perspiration. I appreciated the elastic wrist strap that attaches to the glove allowing me to remove the glove and not loose them. However, you can take the wrist band off if it gets in your way, which it never did for me. The gauntlet sleeve kept snow from getting into my gloves thus adding another layer of protection for my hands. A strap with a velcro closure provide additional protection to close off the gauntlet. While the leather is a bit thick, I still found it supple enough to easily manipulate carabineers or belay devices. My only concern is that I found my finger tips getting very cold so found myself using my Black Diamond liner and abandoning the one that came with glove. I am excited to use this glove in more conditions and have gotten over my fear of roughing it up and tearing the leather. A new generation of gloves are just coming on the market from Mountain Hardwear and Arc'Teryx but for now, I think my Hestra will do the job - provided I get new liners. Bottom Line: Incredibly well made glove but very expensive and not warm without additional protection in super harsh conditions. February 2013 Status Update: Use occasionally, but my hands still get cold in sub freezing conditions. Would not recommend them for the price.
SPOT Satellite GPS Messenger Test Drive - December 2009I received an early present from my Christmas wish list; the latest GPS Personal locator beacon from SPOT otherwise known as the SPOT Satellite GPS Messenger. I took it out for a test drive on an easy hike to Bison Peak in the Lost Creek Wilderness of central Colorado. The SPOT performed well. I wanted SPOT primarily to keep informed of where I was when I was out of cell phone range, which happens often with my iPhone/ATT in the Colorado back country. Also, I thought it would be nice to see my tracks when I got back home. Finally, it might be fun to share some of my climbs while they are happening in addition to posting trip reports after they are over. Has climbing become a spectator sport? I unpacked the box and read the directions, something I don't often do with new gear! However since the SPOT connects directly to a dispatch center, I didn't want to hit the wrong button and read in my local newspaper about "that idiot who asked for help and really didn't need it. He just hit the wrong button on a new toy" With an eye for the detail, I went to the SPOT website where I went through a simple process of registering my device with a unique serial number and identifier. Next I entered my emergency contact's names, emails and numbers and finally programmed the custom messages I wanted sent; this was the hard part. The latest version of SPOT has two custom message buttons: Check-in/OK and a custom message in addition to an SOS and personal help buttons. These last two require you to snap off a cover to prevent unintended messages. , , and I discussed several scenarios where I would use each button. I think this is crucial to using any emergency device, set expectations and have a common and clear understanding of intentions. We settled on a simple "all is fine" for the OK button and a "I am OK but running late. Will call when able" for the personal message. And for the non-life threatening personal help button; "If you don't hear from me live in 4 hours, send help". The last button, SOS, directly connects directly to an emergency notification dispatch center and is to be used in life threatening situations. Next I needed to establish a SPOT Adventures account which was linked to my SPOT account. This is a site that shows my location on a Google map in real time. Again, this was an easy process albeit with an array of confusing menus and options. But once done, I took my new SPOT out for a walk in front of the house. I pushed the simple on/off button. The green GPS light soon lit up and I hit the Check-in/OK button and came back inside. I heard my computer beep that I had a new email and 's cell phone's pong that she had a new message. It was that simple. Another button is Tracks that I was eager to try out in a hilly terrain. With Tracks activated, SPOT sends your location every 10 minutes to your account and can be displayed on a Google map.
Once I had a cell phone signal, I called and she answered with "I followed you all day!" When I returned home I looked at the SPOT Adventures website and saw my tracks on the topo map. SPOT worked as advertised. It was easy and reliable in a relatively open area at 9,000 to 12,000 feet. I actually forgot about it once I got going. liked knowing where I was and following my progress and she appreciated getting the quick OK message on her cell phone when she was out of the house. I must admit that when I did think about the fact I had posted the link to my real-time track map on my Facebook page, I realized that my day hike may have become a spectator sport for some. Nothing wrong with this if anyone is interested, which I doubt! However, it could encourage some to keep going when they should turn back. But that is another subject entirely. For me and my family using SPOT is a good addition to my collection of electronics. We are all safer and more informed. I just hope I never have to hit that SOS button! February 2013 Status Update. Used throughout my 7 Summits climb with good success. Annual subscription price is too high so a luxury item for many. Dear Santa - November 2009I am pretty happy with all my gear these days but being a guy, of course, I want more! And I have given some of my pieces away to Sherpas on climbs so before I venture in to the lower atmosphere again ... here is my Christmas list for 2009 (I will be updating this throughout the season!):
SPOT Satellite GPS Messenger - October 2009Keeping up with friends and family on a far-away mountain expedition has always been challenging. Some teams post dispatches every few days to a website, other climbers just use sat phones to call in. Now a new trend has emerged using a satellite transmitter to "beam" your position every few minutes enabling your location to be shown on a map. Also you can alert Search and Rescue with a touch of a button in an emergency. The SPOT Satellite GPS Messenger has emerged as the leader in this category. 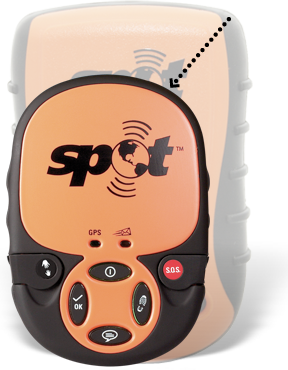
There are some variations on this theme but SPOT has made it very simple - perhaps too simple. Their 2nd generation unit has just been released and is smaller, lighter with improved performance. To get everything needed - unit and tracking service - it costs over $350.00 with an annual renewal for the services. You can read all the details on their website. I recently used one on a climb of a Colorado 14er with my climbing partner John Little. We started at 9,400' in a sharp valley and climbed to an open area around 11,400' - the unit only transmitted our position reliably once we got above tree line and out of the valley. However it was accurate enough that , back at home, was able to track our progress on a Google Map and calculate our rate of ascent and predict our summit time to within 2 minutes! I was not surprised that all the signals did not get through since the system needs line of sight to connect with the satellites. In a heavily wooded area or one with high mountain walls, the signal might not go through - same as with a satellite phone or GPS unit. And for best results, it must face upward toward the satellite so having a rough idea of where it is is useful, especially on international trips. For example, in Nepal the satellite is over Japan so the unit should face east as often as possible. The unit only has few button but a couple are critical - a "SOS" for a life threatening emergency and an "OK" button are the most useful. These, plus 2 other buttons, can only be preprogrammed on the SPOT Website and then messages sent to multiple email addresses of your choosing. There are some concerns on how the SOS button is used, the overall reliability and then simply how to best use the system. All this and more has been discussed on various climbing forums such as these threads on 14ers.com and SummitPost. However most users seem to be satisfied. The SPOT system is owned by Globalstar and utilizes their satellite system. They cover most of the globe with the exception of Africa below the equator and both poles. So it would work on 5 of the 7 Summits (Kilimanjaro and Vinson not being covered). Interestingly, the unit is only rated to work up to an altitude of 21,320' however, I assume it will operate higher than that since it is all solid state with no moving parts similar to a satellite phone which work from the summit of Everest. As you would expect, several sites are now taking advantage of this system with Arktisma showing nice leadership. They offer the ability to link your SPOT with Twitter so everyone will be continuously alerted to your location. Is this good? :) Another nice integration site is SpotAdventures with EveryTrail. But as the saying goes - a fool with a tool is still as fool as shown by this story: At 1:30 a.m. on the morning of September 2nd, the GEOS Emergency
Response Center in Houston notified dispatch of a SPOT personal
satellite tracker 911 activation that had been received from the
park. The location coordinates placed the device along the Tanner
Trail, approximately three miles from the trailhead. An investigation
revealed that the registered owner was associated with a backcountry
permit holder who had extensive hiking experience in the park.
A trail response was begun at first light, just prior to the launch
of the NPS helicopter with additional personnel. A ranger arrived
on scene to find three people asleep in their tents and in no need
of assistance. SPOT has been used quite extensively around the world proving to be quite useful. Several climbers used it on Everest this past spring including Astronaut Scott Paraszynski. And you can track an expedition currently on Pumori using SPOT - Tim Ripple's Peak Freaks team are planning on using it all the way to the summit and even on the flight to Lukla! I expect all commercial teams to begin carrying their own SPOT unit and integrating it into their website's soon. I will probably get one of these for my own use before I leave for Aconcagua. It is less expensive than sat phone time, easier to use but is not as good as hearing a live voice after you have been away from home for weeks. So another electronic gadget in my pack - at least the battery lasts for a long time and it weighs less than a large Mars bar! Bottom Line: An expensive tool to stay in touch but what is the price of worry? February 2013 Status Update. Used throughout my 7 Summits climb with good success. Annual subscription price is too high so a luxury item for many.
Hanesbrand Enters the HA Clothing Market- September 2009When you think about the gear required to climb Mt. Everest, a litany of well-known brands come to mind: Patagonia, Mountain Hardware, Arcâteryx, Black Diamond, The North Face â companies, brands and products that have been around for decades in some cases. And, sadly, their commercial success seems to be marginal at best. In spite of having great products used from professionals to amateurs; the climbing market is simply too small to support the massive R&D, advertising and distribution investment requirements. Thus many sell out to larger conglomerates. VF, the largest apparel company in the world bought North Face; Mountain Hardwear is now owned by Columbia and ArcâTeryx is owned by Adidas-Solomon. Or they leverage their high-end brand into the mass market to increase volume, sometimes at the expense of high-end quality. And of course, some companies survive and flourish. However a new trend is underway with established consumer brands expanding to the high-end. So with this as background, Eddie Bauer introduced an entirely new line of climbing gear this spring with their First Ascent line. Amazing, Eddie Bauer declared bankruptcy just a few months later (but managed a stable recovery and are still successfully in business). They used a high profile Everest expedition including Americaâs leading mountaineer, Ed Vesture, to introduce the line with good success. The expedition coverage and brand introduction was a showcase of web and media technology that goes on to this day. Today, another line of clothing attached to an Everest expedition was announced. Hanesbrand and their Champion and Duofold brands introduced a line of clothing that Canadian climber Jamie Clarke, will use on Everest next spring. The new products included a 4 layer system: base, insulation, soft and hard shell and will follow with a full suit later this year. The suit will have a âdown busterâ material that they said is an improvement on down. By the way, this claim has been the holy grail for gear companies forever. After listening carefully during their press conference this morning, it was difficult to understand why this line is dramatically different from the other well established brands. For example, they discussed a seamless system, new material combinations of wool and polyester, coordinated pocket access across layers and improved wicking capability. The new technologies they discussed included a magical antibacterial material that âhelps the body heal itselfâ. Also they mentioned an intriguing material/system that âreturns energy back to the bodyâ. They declined to explain how this works. Jamie will be doing a test run on Pumori in a few weeks before taking the entire ensemble to Everest next spring. I have met Jamie and he is a humble guy with a huge heart. I wish him and his team safe climbing. As is the case with most introductions these days, a flashy website is available to follow their progress and introduce the brand. I have no doubt the clothing will be fine â Hanesbrand is a huge company steeped in history of socks, underwear, uniforms and base layers for athletes. I think the real question is their commitment to mountaineering gear. At 44 minutes into the press conference, they suggested that the technology in this new line of clothing will transfer into high performance base layers with lower weight and improved insulating performance. This could be a great for cyclists, runners and the causal outdoors person. There is nothing wrong with this strategy but will they expand the line and meet the high quality and performance bar that companies like Patagonia have established? As is the case with many companies â whether it is cars, organic food stores or high performance clothing â the expensive product makes the news but the mass market makes the money. I wish Hanesbrand the best as they embark in this new market. February 2013 Status Update: This was a big publicity stunt with Hanesbrand not entering the high altitude clothing market. Base Layers - July 2009
So then I thought - what is always in my pack and better yet, what do I always wear? After all, that is the true test of a piece of gear - not if you own it but do you use it. Well by this criteria, I had a clear favorite - anything made from Merino wool. My favorite base layer bottom is a pair of Merino wool bottoms, the tops go to Icebreaker Merino wool zip ups. And Smartwool gets the socks category. I have used this combination year after year from a short day hike in the Rocky Mountains to a 2 month expedition in the Karakorum and always on my Everest climbs. There are solid reasons for my selection. First, I like how the soft fabric feels next to my skin - there are too many pains on my butt during a long expedition without adding to it with a harsh and chafing layer. Second, the stuff doesn't seem to smell - well not that bad anyway. Yes after multiple weeks of using the same bottom there is an odiferous zone but it goes away with a quick wash. Third, I never seem to get too hot or cold in spite of wide ranging temperature changes. However, moisture control is the characteristic that always brings me back to Merino wool. I never feel like I am trapped in a sweatshop. It has a magic property of wicking away the moisture before it begins to build. By the way, that is the secret to the no-smell zone. Those stinky bacteria never get a chance to settle in. Finally the lightweight material is easy to cram in my pack. I usually have an extra top stowed away somewhere. The fact that the individual strands of wool absorb water vapor before it condenses makes it an ideal wicking layer. According to a New Zealand industry group, Merino can absorb up to 30% of its weight in moisture before it starts to feel damp. Its regain factor (the amount of water in the fiber expressed as a percentage of its dry weight) is 17 percent under standard conditions, compared to between 1-4 % for synthetic fibers. So what is it with this Merino wool and where does it come from? Merino is a breed of sheep primarily raised in New Zealand and Australia. Selling the wool has tuned into a huge industry. A quick review of the major gear companies that sell Merino wool based products find quick agreement on a few basics: the wool is some of the best quality in the world, it does not irritate the skin like traditional wool, it is renewable and easy on the environment and the wicking ability keeps the skin drier. Merino used to be expensive and not used widely for sports base layers but with competition the price has dropped. Today New Zealand and Australian sheep farmers dominate the market. And quality clothing are available from many of the major brands. In fact Icebreaker has a complete layering system made of 100% Merino wool - very nice. The only real controversy seems to be around how the wool is prepared after sheering. Patagonia explains that each strand of wool contains barb scales that must be removed to prevent skin irritation. Some processes use chlorine to remove the barbs and smooth the material but Patagonia uses a chlorine-free process. Other manufacturers also take environmental friendly manufacturing approaches such as the New Zealand MAPP Tech supplier. When I think about those poor boogers in the days of Mallory and Irvine climbing in harsh and heavy wool layers my admiration for them goes even higher. But I know one thing, they had to be quite warm and probably wasted a lot of energy scratching. If only they had been wearing Merino, I bet they could have told us if they summited or not! Bottom Line: The only material that should ever touch
your skin. February 2013 Status Update. Still love Merino wool and the only material that touches my skin as a baselayer.
Action Wipes - June 2009
The French invented perfume as a way to mask body odor but actually removing the source seems like a much healthier idea. I usually take a box of baby wipes along for extended expeditions and use them daily to clean all the nooks and crannies. I also use them for toilet paper. A box of 500 only cost a few dollars so it is cheap and effective. But there are drawbacks. First, they freeze - try cleaning up with an ice cube :) Second, they are small and rip easily - a real issue when the tear happens at an inopportune moment. Also they come in a shoe box size container and rarely make it above base camp. Finally, it creates quite a pile of trash over time. So an alternative making it's way onto the market is from the small company - Life Elements and their flagship product Action Wipes. Basically an Action Wipes is an individually wrapped strong toilette that is coated with a small amount of sudsing agent and tea tree & eucalyptus oils. The end result is a very strong, almost wash cloth like, towel that easily removes dirt, salt, sweat and odors from all those surfaces, creases and cracks. And it is strong enough that you can reuse it several times or wash it repeatedly. I recently got a chance to use them on a short weekend climb. It was one of those long days with frequent temperature changes as the sun came out then the snow picked up. We climbed a steep snow couloir in a blizzard but returned to camp in the heat of the day. I was covered in salty sweat and felt the effects of wind and sun on my face. Back at camp, I used just one Action Wipes and took care of all my hot spots - if you know what I mean. Anyway, I was pleased at how clean I felt. There was no sticky residues and the eucalyptus scent, while a bit too strong for me, was a welcome new smell. The towel was strong enough to scrub some dirty spots as well as wash away the sunscreen. Thinking about my next long expedition, I will definitely take some Action Wipes along but will probably still bring the baby wipes. I think there is a place for both over a multi week climb. The Action Wipes are not inexpensive at $1 each in quantity but very effective. Bottom Line: A must have hygiene product to keep you
yourself and your friends happy. February 2013 Status Update: Stopped using them due to price. But well worth it if you can afford them.
Leki Trekking Pole - May 2009
The primary reason I use trekking poles are to reduce the wear on my knees. Studies have shown there is a measurable reduction on the joint load when using poles and this matches my personal experience. Also, I like having them for additional balance when crossing streams or traversing narrow logs. There are many models available from many retailers but over the years I seem to buy from Leki. I like their quality, the weight, style and durability. It seems that many people agree with me since I have had two pair stolen! The choices revolve around the suspension of the pole, the ability to adjust height and the grip. Some gear list recommend against getting any kind of flexible bottom - a kind of built in shock absorber that flexes when you push down on the pole - but I like this feature since I think it helps reduce the load on my knees. The length adjustment seems to be the weak part of all trekking poles. A plastic compression joint expands and contracts when twisted thus allowing the two parts of the pole to be adjusted to the correct height - which is to have your forearm parallel to the ground when holding the grip. I have had mixed results with the reliability of this joint but Leki provides a repair kit when the plastic pieces fail. However it is frustrating when you apply pressure at a critical part of a move and the pole collapses into itself. FInally the grip is critically important. They come in all shapes, angles and material but I like the simple slightly bent cork version of the Leki Makalu model. It is comfortable and is secure to grip even with heavy gloves. As for the negatives, I rarely use the strap as designed. In other words tighten it to make for a secure grip. I use it all the time but just as around my wrist and leveraged with my thumb to secure the strap. I find the strap does not adjust easily, gets stuck and is not worth the time and effort to adjust to my glove size at the moment. Also I rarely use the basket system depending on deep snow conditions. The standard one is fine. Finally these poles are expensive, especially when they get stolen! Leki has models from under $100 to almost $200 a pair. REI sell models at $50 but without a few of the features. I have used my Lekis on simple hikes to 14ers to Everest with no complaints. Bottom line: an expensive accessory but a knee saving, must have piece for all trekkers and climbers. February 2013 Status Update. Still use the old pair I bought years ago.
|
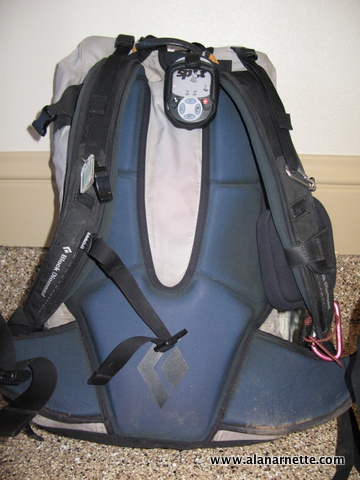
Osprey Aether 85 Pack - April 2009
It packs easily with a nice wide top. Interior compression straps help secure the load. The brain is large and flexible. It detaches for a nice fanny pack but I seldom use this feature. The hipbelt and snaps are solid as are the chest and shoulder straps and pads. The suspension distributes the load evenly making even heavy loads ride comfortably. It feels pliable and light yet is one tough pack. Yeah, I like it. On Denali, I loaded it up with my max of about 70lbs. That included sleeping bag, mat, clothes, tent parts, food and water. Even with pulling a sled weighing in at 50lbs, I felt fine - and I am not that strong of a climber (or puller). The Osprey rode well and accommodated my stuffing and cramming to get everything inside except the mat which was strapped to the outside bottom. But it is not perfect. For example, the light almost mesh like fabric used for the outer front pocket is somewhat fragile and is really only good for cramming a small glove or cap inside. I am always afraid to put my crampons in this pouch without the hassle of a carrying case. There are extra straps for securing this compartment that make the pack look and feel messy if not secured. The tool straps are fine at the bottom but you have to tilt a 70cm axe back towards your head to retain them at the top of the pack - not very good in case of a fall. After over two years of tough use on serious expeditions plus some multi day climbs on my local 14ers, the pack show no serious signs of wear and still feels great. Bottom line: a well built pack suitable for reasonably heavy loads that rides comfortably at a fair price. February 2013 Status Update. Used on many of my 7 Summits. My goto "big pack".
Mountain Hardwear Power Stretch Suit - February 2009
I used to wear a North Face synthetic single piece suit. It was lightweight, wicked well and was a nice base layer. But I had to add a second layer of expedition weight tops and bottoms to keep me warm when it really turned cold and windy. Times have changed. Today, I wear my Mountain Hardwear Power Stretch suit all the time. It is a Polartec fleece single piece sleeveless suit. The design allows for full movement with it's articulated knees. A generous rainbow zipper in the back allows for quick emergency action and a full length zipper up front provides the rest. The fleece is soft on the inside and a spandura overlay on the knees and seat give some decent moisture and abrasion protection. I have worn my suit for years on my Colorado 14ers in the winter and on Everest summit bids. It often serves as my only bottom base layer except for a pair of underpants. OK, more than you wanted to know. I do add a Merino wool top over the Power Stretch since it is sleeveless. I have used it without any additional outer layers since it gives good wind protection on reasonable temperature days. It was my only bottom layer up and down the Khumbu Icefall. Bottom line: a versatile base layer than be used alone or as part of a system in harsh conditions. February 2013 Status Update. Used throughout my 7 Summits climb with good success. Highly recommended still.
Polar Buff - February 2009
The history of this simple piece is instructive for all entrepreneurs. Joan Rojas worked in the textile industry and was an avid biker in northern Spain. But on cold days he would wear military underwear (!) around his neck to stay warm. To quote Juan "I got the idea to improve them because they were itchy and looked pretty ugly" No shit, Juan! He worked on a design and launched it commercially in 1992. And the rest is history! As many of you already know, the Buff is a versatile, single piece of seamless headwear that can be used as a cap, neck muffler, face guard and a thousand more variations depending on your imagination. It is made from Polartec (polyester micro fiber), is lightweight, washable and can be crammed into any nook or cranny of your pack. Take a look at the video on the Buff website for an entertaining demonstration of how to twist, twirl, fold and gyrate this simple piece. I always have it in my pack - summer, winter, spring and fall. It has saved me when I failed to bring a warm jacket. While it can be a cap, I usually use it to cover my nose and mouth to warm cold air before while breathing and to control air flow entering my torso as well as regulating heat escaping from my neck. Buff makes many variations on the original theme and can customize it with your logo or design plus makes versions for kids. Bottom Line: a must have piece no matter the weather
or terrain. February 2013 Status Update. Still a favorite, always in my pack
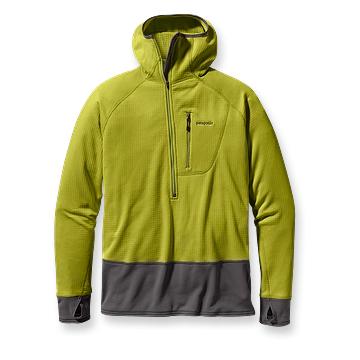
Patagoniaâs MicroPuff Hooded Jacket -
|
|||||||||||||||||||||||||||||||||||||||||||||||||||||||||||||||||||||||||||||||||||||||||||||||||||||||||||||||||||||||||||||||||||||||||||||||||||||||||||||||||||||||||||||||||||||||||||||||||||||||||||||||||||||||||||||
Specs |
Pros |
Cons |
||||||||||||||||||||||||||||||||||||||||||||||||||||||||||||||||||||||||||||||||||||||||||||||||||||||||||||||||||||||||||||||||||||||||||||||||||||||||||||||||||||||||||||||||||||||||||||||||||||||||||||||||||||||||||||
|
|
|
||||||||||||||||||||||||||||||||||||||||||||||||||||||||||||||||||||||||||||||||||||||||||||||||||||||||||||||||||||||||||||||||||||||||||||||||||||||||||||||||||||||||||||||||||||||||||||||||||||||||||||||||||||||||||||
|
 As I packed my gear for Manaslu, I looked at my pile of socks.

 I
had used the Patagonia Micropuff Hooded jacket for years. It was my go-to
warmth layer and was almost always in my pack from Vinson to Everest. It
was the only top layer I wore on many of the 7 Summits. But I had ripped
it and it did not pack very small but still met my needs. However, it was
time to replace it. I liked the primaloft fill since it didn't degrade
when wet but I loved the idea of a new generation of lightweight down jackets
as demonstrated by Mountain Hardwear's Ghost Whisperer and Patagonia's
Ultralight Down Jacket with Hood.
I
had used the Patagonia Micropuff Hooded jacket for years. It was my go-to
warmth layer and was almost always in my pack from Vinson to Everest. It
was the only top layer I wore on many of the 7 Summits. But I had ripped
it and it did not pack very small but still met my needs. However, it was
time to replace it. I liked the primaloft fill since it didn't degrade
when wet but I loved the idea of a new generation of lightweight down jackets
as demonstrated by Mountain Hardwear's Ghost Whisperer and Patagonia's
Ultralight Down Jacket with Hood.  The
second jacket I needed was a replacement for all my wind/rain/snow shells.
I have quite a collection now ranging from heavy Gortex versions to light
wind layers. But I wanted something that would repel a heavy rain or wet
snow plus give me protection in a gale. This selection was more difficult
than the down jacket.
The
second jacket I needed was a replacement for all my wind/rain/snow shells.
I have quite a collection now ranging from heavy Gortex versions to light
wind layers. But I wanted something that would repel a heavy rain or wet
snow plus give me protection in a gale. This selection was more difficult
than the down jacket.  Finally,
I needed a new wind shirt. My Marmot Ion Wind Shirt had served me well
for literally years but was developing holes and was not water resistant
at all. Once again, this category is blessed with choices. But since I
was on the Patagonia site, I looked at their Houdini wind shirt. It was
priced right and offered what I wanted - small, lightweight, compressible
and water repellent.
Finally,
I needed a new wind shirt. My Marmot Ion Wind Shirt had served me well
for literally years but was developing holes and was not water resistant
at all. Once again, this category is blessed with choices. But since I
was on the Patagonia site, I looked at their Houdini wind shirt. It was
priced right and offered what I wanted - small, lightweight, compressible
and water repellent.


 Staying
hydrated is one of the basic tenets of climbing. As the saying goes you can survive
3 weeks without food, 3 days without waters, 3 minutes without oxygen. I have traditionally
used a filtration pump or, worse, iodine tablets to rid my water of giardia or other
pesky bacterium or viruses. But the filters are bulky, weigh a bit and take up a
lot of space in a tight pack. Iodine is, well iodine but is light and works well.
So when a new technology from
Staying
hydrated is one of the basic tenets of climbing. As the saying goes you can survive
3 weeks without food, 3 days without waters, 3 minutes without oxygen. I have traditionally
used a filtration pump or, worse, iodine tablets to rid my water of giardia or other
pesky bacterium or viruses. But the filters are bulky, weigh a bit and take up a
lot of space in a tight pack. Iodine is, well iodine but is light and works well.
So when a new technology from 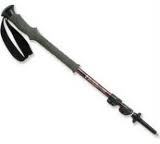
 So
off to the hills! At the trailhead, I turned SPOT on and hit the OK button and
the Tracks button and took off. I attached the unit to the top hand strap on
my day pack so the top of the unit would have a clear view of the sky and not
be in my way. Soon I forgot it was there an enjoyed my day. During a break I
did hit the OK button and once again when I returned to the trailhead.
So
off to the hills! At the trailhead, I turned SPOT on and hit the OK button and
the Tracks button and took off. I attached the unit to the top hand strap on
my day pack so the top of the unit would have a clear view of the sky and not
be in my way. Soon I forgot it was there an enjoyed my day. During a break I
did hit the OK button and once again when I returned to the trailhead. -20
Down Sleeping Bag $650: I gave my -40 WM Bag to my Sherpa
last year on Everest and need a new one. I think -20 is fine,
even for Everest and Vinson given you are in a tent with other
people generating body heat. Plus it is a bit lighter and I always
consider weight these days - at my age ... Looking at
-20
Down Sleeping Bag $650: I gave my -40 WM Bag to my Sherpa
last year on Everest and need a new one. I think -20 is fine,
even for Everest and Vinson given you are in a tent with other
people generating body heat. Plus it is a bit lighter and I always
consider weight these days - at my age ... Looking at  Biners $50 - not that exciting but I need to replace my snaps, lockers
and wires. I love Black Diamond and will get a few of each from
them
Biners $50 - not that exciting but I need to replace my snaps, lockers
and wires. I love Black Diamond and will get a few of each from
them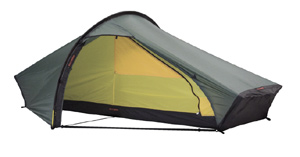

 As
I started to write a review of base layers, I looked at my own
collection and found socks, tops, bottoms and full suits from Arc'Teryx,
Icebreaker, Mountain Hardwear, Patagonia, The North Face and Smartwool
in various materials ranging from power-stretch to polyester to
polypropylene to wool.
As
I started to write a review of base layers, I looked at my own
collection and found socks, tops, bottoms and full suits from Arc'Teryx,
Icebreaker, Mountain Hardwear, Patagonia, The North Face and Smartwool
in various materials ranging from power-stretch to polyester to
polypropylene to wool. Staying
clean is a priority on my climbs and expeditions. After a long
day, the last thing you want to do is to get into the tent and
wonder if THAT smell is you or your tent mate. On one of my Everest
climbs, I remember crawling into my sleeping bag on a particularly
cold night and when trying to stay warm then regretting pulling
the bag over my nose - let's just say it was time for a change
... if you know what I mean.
Staying
clean is a priority on my climbs and expeditions. After a long
day, the last thing you want to do is to get into the tent and
wonder if THAT smell is you or your tent mate. On one of my Everest
climbs, I remember crawling into my sleeping bag on a particularly
cold night and when trying to stay warm then regretting pulling
the bag over my nose - let's just say it was time for a change
... if you know what I mean.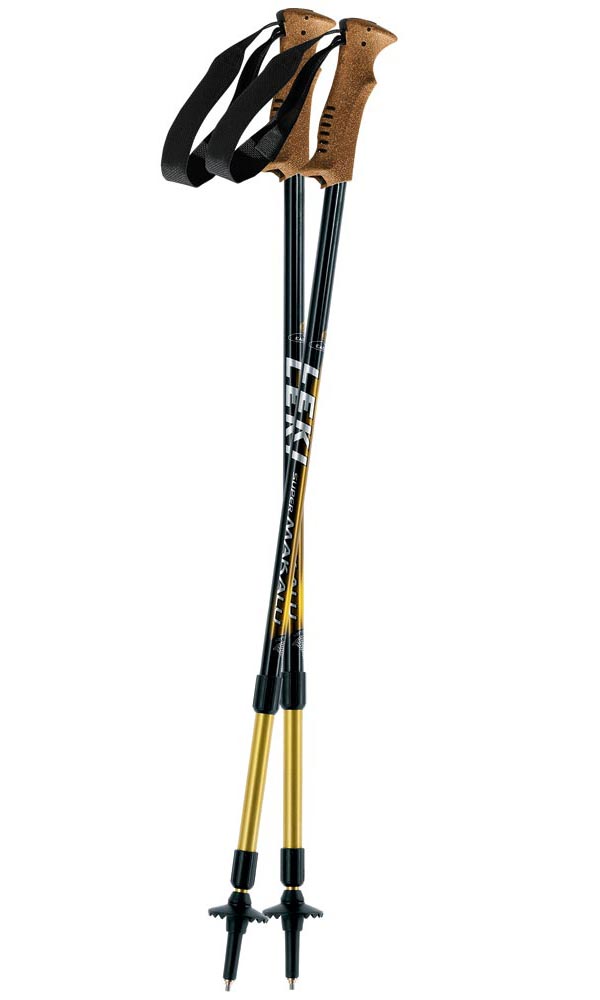
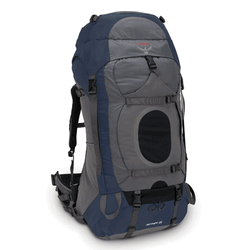 Of
all the gear I have bought over the years, packs seem to be the
most difficult - I have a pile of them. I have owned Gregory, Black
Diamond, Mountain Hardwear, CamelBak and even an expensive McHale
custom model. But I think I finally found a pack and a brand that
meets all my needs without breaking the bank. I have used my Osprey
on Aconcagua, Denali, Orizaba, Shishapangma and Everest carrying
loads to 70lbs.
Of
all the gear I have bought over the years, packs seem to be the
most difficult - I have a pile of them. I have owned Gregory, Black
Diamond, Mountain Hardwear, CamelBak and even an expensive McHale
custom model. But I think I finally found a pack and a brand that
meets all my needs without breaking the bank. I have used my Osprey
on Aconcagua, Denali, Orizaba, Shishapangma and Everest carrying
loads to 70lbs.  An
old joke - "What are you eating under there? Under where?
You are eating underwear?" Ha, ha, ha, ha, ha. Well times
have changed for edible underwear.
An
old joke - "What are you eating under there? Under where?
You are eating underwear?" Ha, ha, ha, ha, ha. Well times
have changed for edible underwear. I
love my Buff! I am using the same one I bought in Chamonix in 1996.
I
love my Buff! I am using the same one I bought in Chamonix in 1996. 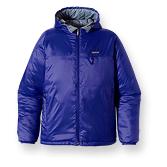 January
2009
January
2009 I
used to favor my Mountain Hardwear Chugach jacket â it was my primary
belay jacket for many years, but something was never quite right
about it. First there was no hood but also it always seemed to
be a bit heavy, did not pack very small and it did not breath as
well as I would have liked.
I
used to favor my Mountain Hardwear Chugach jacket â it was my primary
belay jacket for many years, but something was never quite right
about it. First there was no hood but also it always seemed to
be a bit heavy, did not pack very small and it did not breath as
well as I would have liked.