Mt. Everest Background
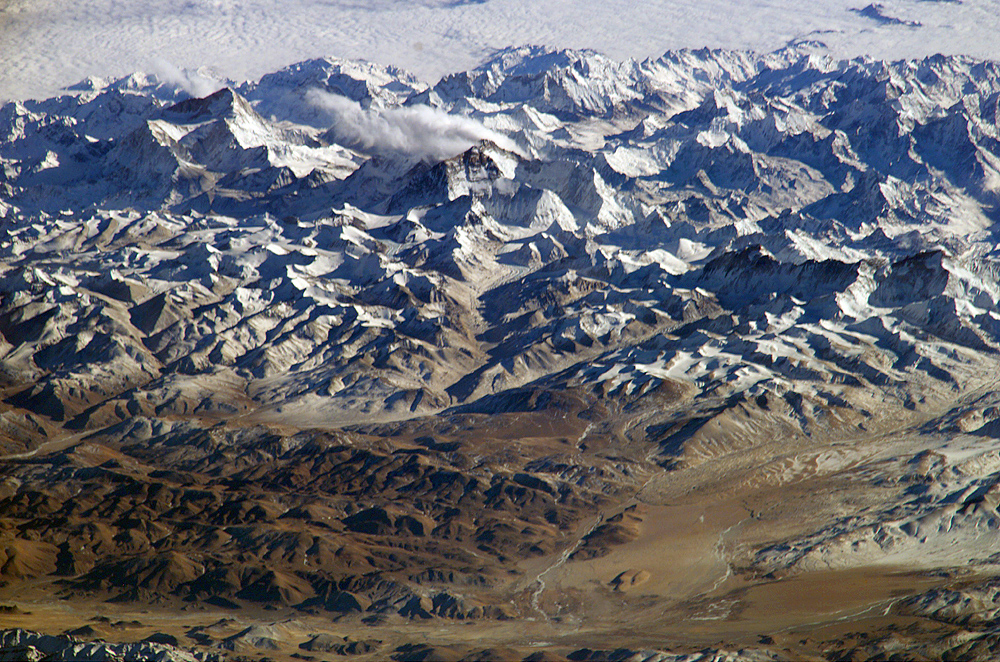
Himalaya - Nepal
29,031.69-feet or 8848.86-meter
Himalaya - Nepal
29,031.69-feet or 8848.86-meter
|
|
Mt. Everest Background
Himalaya - Nepal 29,031.69-feet or 8848.86-meter |
||||||||||
|
|||||||||||
Everest Background ArticlesDressing for EverestWhat do you wear when the temperature goes from 100° F to 10° F in a matter of minutes? Oh and you have to carry everything in your backpack. Oh and the wind may go from calm to gale force. Ok, let’s not forget a blinding whiteout. Exaggeration, Hyperbole? No, it is the Western Cwm on Everest’s South Col route. Clothing is one of the most important investments high altitude climbers make. It literally becomes a matter of life and death during the climb. The short answer to the dilemma is layers. In other words a well thought out system of varying weight layers of clothing that are easily removed or added as the conditions change. There are three basic levels: wick, warmth and wind/snow. Let’s take them one at a time. Removing the moisture from your skin is the key to maintaining a warm, comfortable and safe climbing environment within your clothing. There are several ways to manage this moisture. Most climbers were very lightweight capiline or merino wool, which I prefer, next to the skin. This layer wicks the moisture away from the skin and, hopefully, evaporates. The other advantage of this layer is that is dries quickly. You always hear never to wear cotton while climbing, this is because it does not wick nor dry. A layer of wet clothing against your skin can accelerate hypothermia, frostbite and even death. Many climbers have suffered this fate thus the importance of the base layer.
The final layer is for protection against wind and snow. The standard for high altitude is down. There are two approaches - a full down suit or separate down jacket and pants. The full suit has the advantage of no gaps at the waistline. This is important when you are bending over to clip in or reaching for difficult holds. In high winds, this gap can “leak” and destroy your carefully designed cocoon. You can also sleep in a full suit and bring a lighter sleeping bag to the High Camps. The disadvantage is that when it warms up, you cannot easily strip down. The standard procedure is to pull the top down and wrap the arms around your waist. This is very bulky and is still hot. A separate down jacket has the advantage that it can be used in camps, during rest stops and during the climb. Paints have the same advantage. Down is the warmest insulating material but becomes useless when extremely wet. Primaloft or synthetic down avoids this problem but is not as warm. Most climbers select down for their critical layer at high altitudes. Some climbers incorporate a gortex jacket and/or bibs as an outer layer in strong wind conditions where it is not extremely cold. Finally, protection for the hands, head and feet complete the system. Again, layers apply here as well. I cover boots below but the summary are wool socks, double insulating boots and integrated gators to keep the snow out. Hands are protected with lightweight “liner” gloves followed by a wind stopper type material on a heavier glove. And for the highest altitudes down mittens – not gloves – that create an inner air space to keep fingers warm.
As you can see, there are many levels, pieces and approaches that go into the climbing cocoon. It is expensive to get all this gear and also takes some time to get used to wearing the right layer for the conditions. The goal is always not to be too hot or too cold. Click here for a complete list of all my gear. Training For EverestHow do you train your body to withstand a third of the oxygen in every breath, every muscle screaming for more blood while your insides literally are dying while you sleep? Perhaps an even better question, other than why, is how do you train your mind? Veteran Everest climbers know what they will experience. First time climbers are shocked at the experience. My personal experience was difficult. I experienced a lung infection that stopped a climb and on another, my body simply refused to acclimatize above 23,000’. With the clear disclaimer that I am not a doctor and everyone should visit their own Doc before entering any kind of Everest training program, let’s talk from experience. Also there are many programs out there so this is just what I like for myself. So what is the best way to train your mind and body to make the top … and return, safely? There are many approaches to athletic training all the way from the nightly jogger to the weekend warrior to dedicated amateur to the professional. Often it boils down to time and motivation. The vast majority of Everest climbers have full time jobs, full time families and cannot spend several hours a day for a year to get in professional shape. The professional or highly dedicated will speak of VO2 max which is the maximum rate your body can move and use oxygen during periods of high stress or need. Another couple of terms are anaerobic threshold (AT) and lactate threshold which is when the chemical lactate acid begins to build in your blood stream and muscles thus preventing the body from functionally at full capacity. A qualified doctor or trainer can measure these levels through a series of treadmill and blood tests. However, the essence of these measures and tests is to determine how to get red blood cells to your muscles and that is the key to climbing Everest. There is a third of the available oxygen on the summit of Everest thus making your heart, lungs and muscles cry out for more oxygen during the climb. Red blood cells, which carry oxygen rich blood to muscles, are increased in response to this lack of oxygen. However this takes time thus the acclimatization process where you “climb high, sleep low” to encourage the production of these red friends. Training before you get to Everest must begin 12 to 18 months with a focused, intense and balanced exercise program – after a check up from your Doc. In my mind there are three major phases: foundation, aerobic/strength and peaking. The major groups to work on include: heart, lungs, abs, lower back muscles, thighs and calves. continuing reading plus a sample training schedule The Price of Your ToesProper footwear is one of the most important choices when climbing Everest. And, it is fairly simple. But it is also bewildering. Not only must you choose the style but also the socks, warmth and the unknown.
The key to all these models is the inner boot. It is a soft, space-age material, Aveolite, that feels like a slipper but is extremely warm. Some climbers are starting to add even more warmth, however by stealing a page from skier’s book. Hotronics is a foot bed warmer that is battery operated. I have used it successfully on Everest and Manaslu. As for socks, most climbers wear at least a thin wool sock and a heavy outer sock from companies such as Smartwool. Some prefer two thick socks but the key here is to buy the boot large enough to accommodate all that bulk. As for the bewildering part? Feet swell at altitude and especially after long days. But how much? And do you buy a boot assuming yours will or will not? My experience has been to buy a size larger and find socks that fit you well.
All this technology has a price. Boots will run between $500 to $850. Socks, $20 a pair. And another $190 for the crampons. A grand total of perhaps $1000! But then again, how much are your toes worth? Read more of my thoughts and an overview of boots at this link Oxygen on Everest
For some climbers they will never use bottled oxygen since it creates a dependency on a system that could fail thus increasing your risks above 8000m. Others feel it is cheating - if you cannot climb without it you should not be there. This debate has gone on since the practice started with the Swiss Everest climbs in the early 1920's and continues today. In any event, the vast majority of climbers today use some form of supplemental oxygen. But note that it makes an effective difference of about 3,000' on how your body feels. So at 26,000' you still feel like you are at 23,000 feet! So why use oxygen at all? First, the science. The air we breath has a mixture of gases including oxygen and nitrogen. The atmosphere contains about 21% oxygen at all altitudes. What changes as we go higher is the air pressure. Gravity pulls on gas molecules in the air. The closer to the Earth's surface, the more pressure. At the summit of Everest, the pressure was measured in 1981 by a Nova team at 253 mmHG. At sea level it is 760 mmHG. The reason for the lower pressure is that there is less atmosphere pushing down from above. This reduced pressure allows the air molecules to scatter. This means that on Everest the air is not as dense or "thick". In other words there is the same amount of oxygen but the molecules are scattered thus the term "thin air". So in each breath there is less oxygen. To be precise about 66% less! The critical benefit of using bottled oxygen is warmth. By reducing the work the heart and lungs have to do to keep your core warm, blood continues to flow to toes and fingers thus reducing the risk of frostbite. Climbers have a few choices of systems. The first is the traditional approach using a pilot's face mask and the Russian POISK system. The POISK system use bottles filled at the factory in St-Petersburg, Russia (be careful of fraud with claims that bottles are new but are refilled in non-certified facilities). The oxygen is delivered through a regulator to a tube to a face mask that provides a constant flow of oxygen. They hold about 720 liters of oxygen and weigh about 5.6 lbs. Climbers usually run their flow at 2 liters per minute and count on getting about 6 hours out a bottle. If they use more flow - 3lpm the bottle only last 4 hours. Most expeditions will use POSIX cylinders. I used the Poisk system on Cho Oyu in 1998 and Everest in 2002 and 2003. POISK has updated their mask design but the old models leaked and fit poorly to a climber's face.
I used it on my 2011 Everest summit with good success however, the mask lines did freeze up on my descent of the Hillary Step and it took a good fist blow from my Sherpa to clear the ice. This is actually a serious issue that several of my teammates also experienced. Most expeditions will assume 5 to 7 3L bottles per climbers on Everest. It takes a lot of work to get the bottles positioned on the mountain. Sherpas usually cache some at C3, South Col, Balcony and the South Summit. Obviously they are used for the summit as well as the descent. Due to Nepal regulations on the south side, all the bottles are carried down and reused for future expeditions. The days of littering the mountain are hopefully gone forever. That said, real effort is needed to clean up the north.
Gasping for breath, struggling to see where you are stepping or hauling an extra 13lbs in the Death Zone is uncomfortable. But very few climbers would trade the discomforts for that extra 3000 feet! read more of my thoughts and a current review of oxygen system for Everest this link The Khumbu CoughI have been to the Everest region nine times and the Khumbu cough was my constant friend each time. Friend is a nice way of saying a constant companion - an annoying one but nonetheless a companion. BasecampMD, the website of the medical clinic staffed each spring on the south side of Everest at base camp, has a nice medical explanation and article about the cough. Basically it occurs when air brought into the lungs is too cold and too dry. Thus the lining of the lungs become inflamed and lose their ability to expel moisture and small particles. Bottom line is that in addition to an incredibly annoying cough, it hurts to breath. You may say, so how bad can a cough be? Well, bad enough that you cannot sleep, ribs can get broken, you cannot breath when climbing and bad enough that all your climbing partners make you sleep in the toilet tent! But for me, it turned into a lung infection that killed any hopes of a summit in 2002. I clearly remember standing at 27,200' between the Balcony and the South Col, violently coughing, dry heaving and finally having zero energy to take another step. In the category of misery loves company, here is an excerpt from BasecampMD from a climber in 1924: "Finally, as we approached the level of 28,000 feet [8534 m], the summit being only half a mile away or less, I felt that, as far as I was concerned, it was hopeless to continue. I told Norton that he had no chance of the summit with me. My throat was not only extremely painful, but was getting almost blocked up—why, I knew not. . . . Somewhere about 25,000 feet [7620 m] high [on the descent], when darkness was gathering, I had one of my fits of coughing and dislodged something in my throat which stuck so that I could breathe neither in nor out. I could not, of course, make a sign to Norton, or stop him, for the rope was off now; so I sat in the snow to die whilst he walked on, little knowing that his companion was awaiting the end only a few yards behind him. I made one or two attempts to breathe, but nothing happened. Finally, I pressed my chest with both hands, gave one last almighty push—and the obstruction came up. What a relief! Coughing up a little blood, I once more breathed really freely—more freely than I had done for some days." For those headed up there this year, the only advice I can offer is to wear a mask or bandanna over your mouth from Namche on. Use hard candy to keep your mouth moist, try to breath though your nose as much as possible and stay hydrated. Check out the BasecampMD site for more ideas.
|
||||||||||||||||||||||||||
| Pluses | Concerns |
| Beautiful trek to base camp in the Khumbu | Khumbu Icefall instability |
| Easy access to villages for pre-summit recovery | Crowds, especially on summit night |
| Helicopter rescue from base camp if necessary | Cornice Traverse exposure |
| Slightly warmer sometimes with less winds | Slightly longer summit night |
| Pluses | Concerns |
| Less crowds | Colder temps and harsher winds |
| Can drive to base camp | Camps at higher elevations |
| Easier climbing to mid-level camps | A bit more difficult with smooth or loose rocks |
| Slightly shorter summit night | No opportunity for helicopter rescue at any point |
Now let's take an in-depth look at both sides
 the experience he used on the British expedition. The Swiss returned in 1956 to make the second summit of Everest. Here is a typical south side climb schedule showing average time and the distance from the previous camp plus a brief description of each section. More details can be found on the South Col route page.
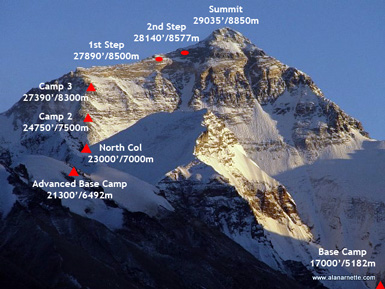 The north side of Everest is steeped in history with multiple attempts throughout the 1920âs and 1930âs. The first attempt was by a British team in 1921. Mallory led a small team to be the first human to set foot on the mountains flanks by climbing up to the North Col (7003m). The second expedition, in 1922 reached 27,300â² before turning back, and was the first team to use supplemental oxygen. It was also on this expedition that the first deaths were reported when an avalanche killed seven Sherpas. The 1924 British expedition with George Mallory and Andrew âSandyâ Irvine is most notable for the mystery of whether they summited or not. If they did summit, that would precede Tenzing and Hilary by 29 years. Malloryâs body was found in 1999 but there was no proof that he died going up or coming down. A Chinese team made the first summit from Tibet on May 25, 1960. Nawang Gombu (Tibetan) and Chinese Chu Yin-Hau and Wang Fu-zhou, who is said to have climbed the Second Step in his sock feet, claimed the honor. In 1975, on a successful summit expedition, the Chinese installed the ladder on the Second Step. Tibet was closed to foreigners from 1950 to 1980 preventing any further attempts until a Japanese team summited in 1980 via the Hornbein Couloir on the North Face. The north side started to attract more climbers in the mid 1990s and today is almost as popular as the South side when the Chinese allow permits. In 2008 and 2009, obtaining a permit was difficult thus preventing many expeditions from attempting any route from Tibet. Now let's look at typical north side schedule showing average time from the previous camp plus a brief description of each section. More details can be found on the Northeast Ridge route page.
For a more detailed description and route pictures, please see the Northeast Ridge route page.
The Himalayan Database reports that through December 2024, there have been 12,884 summits of Everest through December 2024, on all routes by 7,269 different people. Those climbers who have summited multiple times include 1,670 members and 2,003 Sherpa, for 4,620 total summits. There have been 962 summits by women members.
Summits
The Nepal side is more popular, with 9,156 summits compared to 3,728 summits from the Tibet side. Only 229 climbers summited without supplemental oxygen through December 2024, about 1.7%. Only 35 climbers have traversed from one side to the other. Member summit success stands at 39%, with 5,899 who attempted to summit, making it out of 14,496 who tried. About 66% of all expeditions put at least one member on the summit. Few climbers have summited from both Nepal and Tibet, totaling only 681. Even fewer, 155, have summited more than once in a single season.
Almost all Sherpas, 78, have summited within seven days of their first summit that season. Kami Rita Sherpa (Thami) holds the record for most summits at 31, with Paswang Dawa (PA Dawa) Sherpa of Pangboche close behind with 27 summits. Brit Kenton Cool has 18 for a non-Sherpa record. Eleven Sherpas have 20 or more summits. One hundred and one Sherpas have summited Everest 10 or more times. Member climbers from the USA have the most country member summits at 1,078, followed by China at 683, India at 605, and the UK at 560.
Deaths
As for Everest deaths, 335 people (203 Westerners and 129 Sherpas) died from 1922 to December 2024. These deaths account for about 2.7% of those who summited, resulting in a death rate of 1.11% among those who attempted to reach the summit. Westerners die at a higher rate of 1.36%, compared to Sherpas at 0.84%. Descending from the summit is deadly, with 74 deaths, or 22% of the total fatalities. Female climbers have a lower death rate of 0.81% compared to 1.14% for male climbers, and 14 women have died on Everest.
The Nepalese side has seen 9,156 summits with 225 deaths through December 2024, or 2.5%, representing a rate of 1.12%. One hundred thirty deaths, or 27%, did not use oxygen. The Tibet side has witnessed 3,728 summits with 98 deaths through December 2024, or 2.6%, a rate of 0.98%. Thirty-eight individuals died without using oxygen. Countries with the most deaths among climbers include India at 28, the UK (19), Japan (19), the US (17), and China (12), with South Korea at 11. Nepal has the absolute highest number of deaths at 135, dominated by Sherpas. Most bodies remain on the mountain, but China has removed many from view on its side. The top causes of death are avalanches (77), falls (75), altitude sickness (45), and exposure (26).
Latest: Spring 2024
In 2024, 861 summits were made, including 74 from Tibet and 787 from Nepal. All but 5 used supplemental oxygen. 77% of all attempts by members were successful. Of the total, 73 females summited. The Tibet side saw a 67% summit rate compared to 68% on the Nepal side. Eight Everest climbers died.
Everest compared to Other 8000ers
Everest is becoming safer even though more people are now climbing. From 1923 to 1999, 170 people died on Everest with 1,170 summits, or 14.5%. But the deaths drastically declined from 2000 to 2024, with 11,714 summits and 165 deaths, or 1.4%. However, four years skewed the death rates, with 17 in 2014, 14 in 2015, 11 in 2019, and a record 18 in 2023. The reduction in deaths is primarily due to significantly higher Sherpa support ratios, improved supplemental oxygen at higher flow rates (up to 8 lpm), better gear, accurate weather forecasting, and more people climbing with commercial operations.
Of the 8,000-meter peaks, Everest has the highest absolute number of deaths (member and hired) at 335 but ranks near the bottom with a death rate of 1.11. Annapurna is the most deadly 8,000er, with one death for about every fifteen summits (73:514) or a 3.30 death rate. Cho Oyu is the safest, with 4,158 summits and 52 deaths, or a death rate of 0.54, with Lhotse next at 0.61. Of note, 81 Everest member climbers out of 206 member deaths died descending from the summit, or 39%. K2's death rate has fallen dramatically from the historic 1:4 to around 1:8, primarily due to more commercial expeditions with large Sherpa support ratios.
Each year is different on Everest. The temperatures can be colder or hotter, winter snows more or less and of course, the wildcard is when the jet stream moves off the summit. Predicting Everest weather is difficult at best.
Experts around the world send daily updates to expedition leaders who analyze the reports as compared with what they are seeing. When the winds are predicted to be under 25 m.p.h over a 48 hour period, teams set off for the top of the world.
So which side is easier? As I always say, pick you poison. The south has the Icefall; the north the exposed northeast ridge and the Steps. In spite of the Icefall dangers, I think most operators will say the south side is safer and slightly easier. One sobering statistic backs up this advice - more climbers, by a 2:1 ratio, have died on the north than the south since 2000 as I explained in this earlier post.
But the real answer is no one knows for certain what each season will bring. So train hard, get skills on low mountains and altitude experience on another 8000m mountain before Everest and go with a team you can count on in an emergency.
Climb On!
Alan
|
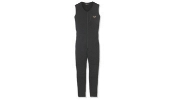 The next layer is for warmth. There are many choices here depending on personal preference and/or conditions. I like a medium weight pull over top or a full body suit such as the Mountain Hardwear Powerstretch suit. It is made of a medium weight fleece that breathes thus allowing moisture wicked away from the skin to pass through. Many climbers use fleece jackets and pants.
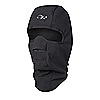 The head is usually protected with a knit skull cap made of windstopper material. As conditions get worse a full balaclava that covers the nose. A neck warmer is a must. Finally the down hood from the suit or jacket competes the cover. Glacier sunglasses that block 99% of the harmful light is a must sometimes combined or replaced by goggles in windy and blowing snow conditions.
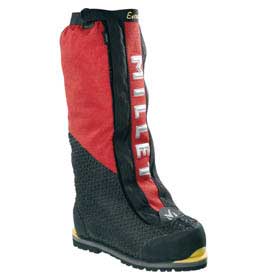 The most common boots used on Everest today are models that incorporate an insulating inner boot and a hard outer boot. The two most popular boots are the
  Another options used by some climbers is a warm climbing boot such as Koflach’s Artic Expe. It also has an inner boot that fits snugly inside the hard outer boot. Some climbers use an outer boot for maximum warmth in extreme temperatures. I also have used this boot on Denali and Aconcagua with no problems and with and without the outer boot.
 The final part of the footwear decision are crampons – you know those spikes that keep you attached to the mountain– hopefully! My choice are models from Black Diamond such as the Sabertooth Pro. These are 12 point models with 2 of the points sticking out from the front used to grip steeper slopes or ice. This model comes with a plastic insert that reduces snow buildup under your foot and potentially eliminating the advantage of the crampon in the first place.
 One of the most important decisions climbers make when planning an Everest climb is the use supplemental oxygen. This is harder than it seems.
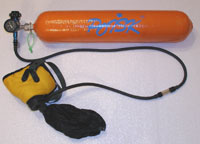
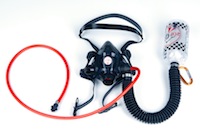 The mask from
 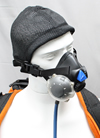 A fast rising entry on the market is from
 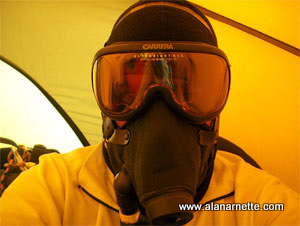 On summit night, climbers put one or two bottles in their packs. The rubber tube runs over their shoulder to the mask. Some mask models interfere with visibility in that it is almost impossible to see your feet. This makes you go even slower! And the older mask designs are not 100% sealed around your face, air escapes fogging up goggles, precious oxygen leaks from the gaps and there is no capacity to provide extra oxygen "on-demand" during big moves.