
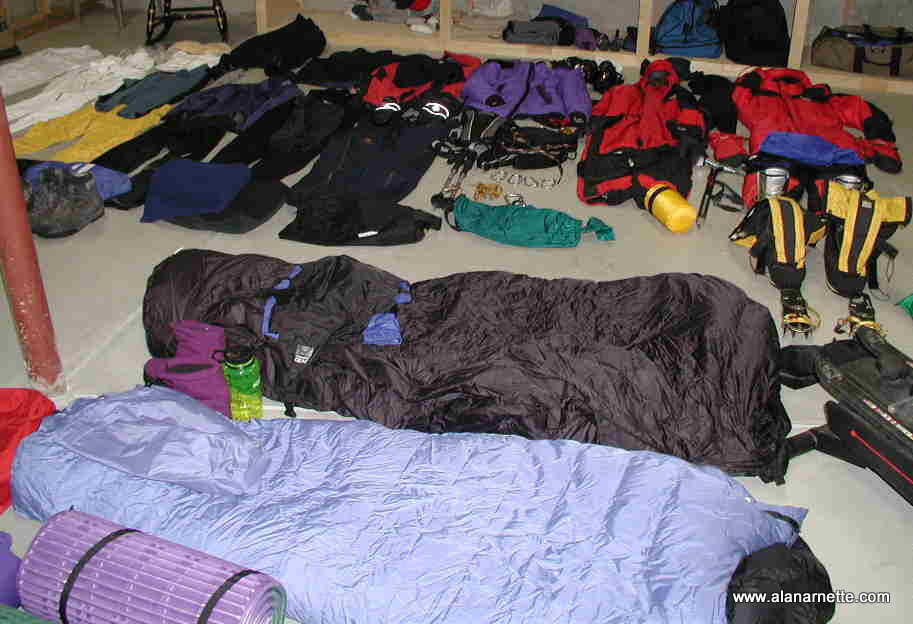
It is less than 3 few weeks until I leave and I have all my gear laid out on the floor. I like to stand and look at it for what seems like hours visualizing every section of the climb. I have my lists but I find it most useful to think through each section, imagining the worse and cases and be prepared. You would think I would l have it down by now!
Everest is very different than all the other 7 Summits. First, find you never carry that much in your pack, illness or drag a sled. Then you don’t even worry too much about tents, food, stoves and fuel when you use a commercial logistics service like I am with International Mountain Guides. The Sherpas are an incredible asset to climbers like me as are the cooks, and porters. And let’s not forget the Zo’s and Yaks! All this support allows me to focus on staying healthy and the climb.
I like to think of Everest, in terms of gear, in four stages:
- Trek to Base Camp
- Base Camp life
- Acclimatization Rotations
- Summit Bid
If you have read my other posting about gear on Vinson or Aconcagua or looked at my gear list, you will know what I am about to say about clothing in the mountains. It is all about layers and knowing what to use depending on the conditions and having it accessible on a moments notice.
The other story line for Everest is life at Base Camp. You spend weeks on the Khumbu Glacier living out of 48 square feet or less. This is where you sleep, think, get some alone time to think and read or write in a diary. It is home and it must be comfortable.
So with all this, I created a video showing how I approach Everest. Others will do it differently and there are no hard rules. Just whatever works for you is what I say.
Finally, I don’t cover my communication equipment but I will be sending dispatches back to this website and Facebook pages on behalf the The 7 Summits Climb for Alzheimer’s: Memories are Everything. I hope this encourages you to get involved, learn about Alzheimer’s and make a donation.
I hope you enjoy the video.
What follows is a discussion on my gear approach along with some brands I use. Also, please see my gear list page for the entire list. Again, everyone has their favorites but this is what has worked for me on many mountains and many years.
Dressing for Everest
What do you wear when the temperature goes from 100° F to 10° F in a matter of minutes? Oh and you have to carry everything in your backpack. Oh and the wind may go from calm to gale force. Ok, let’s not forget a blinding whiteout. Exaggeration, Hyperbole? No, it is the Western Cwm on Everest’s South Col route.
Clothing is one of the most important investments high altitude climbers make. It literally becomes a matter of life and death during the climb. The short answer to the dilemma is layers. In other words a well thought out system of varying weight layers of clothing that are easily removed or added as the conditions change.
There are three basic levels: wick, warmth and wind/snow. Let’s take them one at a time.
Removing the moisture from your skin is the key to maintaining a warm, comfortable and safe climbing environment within your clothing. There are several ways to manage this moisture. Most climbers were very lightweight capilene or merino wool next to the skin. This layer wicks the moisture away from the skin and, hopefully, evaporates.
The other advantage of this layer is that is dries quickly. You always hear never to wear cotton while climbing, this is because it does not wick nor dry quickly. A layer of wet clothing against your skin can accelerate hypothermia, frostbite and even death. Many climbers have suffered this fate thus the importance of the base layer.
The next layer is for warmth. There are many choices here depending on personal preference and/or conditions. I like a medium weight pull over top like the Patagonia R1 Hoody and/or a full body suit such as the Mountain Hardwear Power Stretch suit. It is made of a medium weight fleece that breathes thus allowing moisture wicked away from the skin to pass through.
The final layer is for protection against wind and snow. The standard for high altitude is down. On summit night, there are two approaches – a full down suit or separate down jacket and pants. The full suit has the advantage of no gaps at the waistline. This is important when you are bending over to clip in or reaching for difficult holds. In high winds, this gap can “leak” and destroy your carefully designed cocoon. You can also sleep in a full suit and bring a lighter sleeping bag to the high camps. The disadvantage is that when it warms up, you cannot easily strip down. The standard procedure is to pull the top down and wrap the arms around your waist. This is very bulky and is still hot.
A separate down jacket has the advantage that it can be used in camps, during rest stops and during the climb. Paints have the same advantage. Down is the warmest insulating material but becomes useless when extremely wet. Primaloft or synthetic down avoids this problem but is not as warm. Most climbers select down for their critical layer at high altitudes.
Finally, protection for the hands, head and feet complete the system. Again, layers apply here as well.
Hands are protected with lightweight “liner” gloves followed by a wind stopper type material on a heavier glove. And for the highest altitudes, today many climbers used some version of ski gloves. While I will always have mittens in my pack, I now use gloves that allow me to remain protected yet have the dexterity to work an ascender or carabiners. Mittens, while still warmer than gloves due to captured inner air space are a true threat for frostbite if you have to take them off every time you need to clip onto or off a fixed line. I use mittens at long rest stops or for emergencies.
The head is usually protected with a knit skull cap made of windstopper material. As conditions get worse a full balaclava that covers the nose is used. A neck warmer such as from Buff is a must. Finally the down hood from the suit or jacket competes the cover. Glacier sunglasses that block 99% of the harmful light is a must sometimes combined or replaced by goggles in windy and blowing snow conditions.
As you can see, there are many levels, pieces and approaches that go into the climbing cocoon. It is expensive to get all this gear and also takes some time to get used to wearing the right layer for the conditions. The goal is always not to be too hot or too cold plus not wear too many layers or ones that don’t breath. Long zippers on all layers that allow venting is crucial. Click here for a complete list of all my gear.
The Price of Your Toes
Proper footwear is one of the most important choices when climbing Everest. And, it is fairly simple. But it is also bewildering. Not only must you choose the style but also the socks, warmth and the unknown. Perhaps the most important element is keeping dry feet! The footbed warmer people, Hotronics quotes these interesting facts:
- Wet conductive heat loss is 23 times greater than dry heat loss. (W. L. Gore & Associates, 1994)
- Feet perspire more than any other part of your body except your head and hands. Each foot perspires about 1/4 cup of water a day at rest and one full cup when active. (W. L. Gore & Associates, 1994)
The most common boots used on Everest today are models that incorporate an insulating inner boot and a hard outer boot. This technology has advance significantly over the past decade and there are many choices for climbers. Two popular boots are the Olympus Mons Evo by La Sportiva and Millet’s Everest GTX . These boots also have an integrated gator thus simplifying getting dressed in the morning and providing a closed environment for your foot. I have used both and now use a similar model, the Kayland 8001. However with so many choices out here it is hard to wrong but climbers become very loyal to a brand that works for them.
Another options used by some climbers is a double plastic climbing boot such as Koflach’s Artic Expe. It also has an inner boot that fits snugly inside the hard outer boot. Some climbers use an overboot for maximum warmth in extreme temperatures. I also have used this boot on Denali and Aconcagua with no problems and without an overboot.
The key to all these models is the inner boot. It is a soft, space-age material, Aveolite, that feels like a slipper but is extremely warm. Some climbers are starting to add even more warmth, however by stealing a page from skier’s book. Hotronics is a foot bed warmer that is battery operated. Another popular option is to have a custom inner boot such as from Intuition.
As for socks, most climbers wear at least a thin wool sock and a heavy outer sock from companies such as Smartwool or REI. Some prefer two thick socks but the key here is to the boot large enough to accommodate all that bulk.
As for the bewildering part? Feet swell at altitude and especially after long days. But how much? And do you a boot assuming yours will or will not? My experience has been to a size larger and find socks that fit you well.
The final part of the footwear decision are crampons – you know those spikes that keep you attached to the mountain– hopefully! I have used models from Grivel, like the step-in G12 and G14. These are 12 point models with 2 of the points sticking out from the front used to grip steeper slopes or ice. This model comes with a plastic insert that reduces snow buildup under your foot and potentially eliminating the advantage of the crampon in the first place. Today I am using the stainless steel Black Diamond Sabretooth Pro. It is light weight and does not rust.
All this technology has a price. Boots will run between $500 to $850. Socks, $20 a pair. And another $190 for the crampons. A grand total of perhaps $1000! But then again, how much are your toes worth?
Oxygen on Everest
One of the most important decisions climber make when planning an Everest climb is the use supplemental oxygen. This is harder than it seems. For some climbers they will never use bottled oxygen since it creates a dependency on a system that could fail thus increasing your risks above 8000m. Others feel it is cheating – if you cannot climb without it you should not be there.
This debate has gone on since the practice started with the Swiss Everest climbs in the early 1920’s and continues today. Of note Tensing and Hillary used O’s but Messner proved it was not necessary. In any event, almost all climbers today use some form of supplemental oxygen. However it makes an effective difference of about 3,000′ on how your body feels. So at 26,000′ you still feel like you are at 23,000 feet!
So why use oxygen at all?
First, the science. The air we breath has a mixture of gases including oxygen and nitrogen. The atmosphere contains about 21% oxygen at all altitudes. What changes as we go higher is the air pressure. Gravity pulls on gas molecules in the air. The closer to the Earth’s surface, the more pressure; the higher, less. At the summit of Everest, the pressure was measured in 1981 by a Nova team at 253 mmHG. At sea level it is 760 mmHG. The reason for the lower pressure is that there is less atmosphere pushing down from above. This reduced pressure allows the air molecules to scatter. This means that on Everest the air is not as dense or “thick”. In other words there is the same amount of oxygen but the molecules are scattered thus the term “thin air”. So in each breath there is less oxygen. To be precise about 66% less!
The critical benefit of using bottled oxygen is warmth. By reducing the work the heart and lungs have to do to keep your core warm, blood continues to flow to toes and fingers thus reducing the risk of frostbite.
Climbers really have few choices of systems. The traditional approach for decades was the Russian POISK system. It used using a fighter pilot’s face mask and was very uncomfortable pulsed leaked much of your precious oxygen. Today, most top notch expeditions use the system from Top Out.
Designed by British RAF Flt. Lt and Everest climber, Ted Atkins, the Top Out system uses a separate reservoir to meet instant demands. Also the mask fits tightly to the face preventing leaks and finally it works with the POISK oxygen bottles. It has become the new standard for oxygen delivery on all high altitude climbs.
The POISK system use bottles usually filled at the factory in St-Petersburg, Russia (be careful of fraud with claims that bottles are new but are really refilled in other places.) The oxygen is delivered through a regulator to a tube to the face mask that provides a constant flow of oxygen. They hold about 720 liters of oxygen and weigh about 5.6 lbs. Climbers usually run their flow at 2 liters per minute and count on getting about 6 hours out a bottle. If they use more flow – 3lpm the bottle only last 4 hours.
Another approach is used by International Mountain Guides. They use a large bottle that holds 1600 liters and weighs about 17 lbs. The benefit is a reduction in time consuming bottle switches plus no one will steal them since they are only used by IMG. The downside is the weight, lack of redundancy. But they have been used for over 10 years with a excellent track record.
Most expeditions will assume 5 to 7 bottles per climbers. It takes a lot of work to get the bottles positioned on the mountain. Sherpas will cache some at C3, South Col, Balcony and the South Summit. Obviously they are used for the summit as well as the descent. Due to Nepal regulations on the south side, all the bottles are carried down and reused for future expeditions. The days of littering the mountain are hopefully gone forever.
On summit night, climbers put one or two bottles in their packs. The rubber tube runs over their shoulder to the mask. Many climbers put tape on their cheekbones and nose-bridge since the masks will rub those areas raw after 18 hours on a summit climb. The mask interferes with visibility in that it is almost impossible to see your feet. This makes you go even slower!
Gasping for breath, struggling to see where you are stepping or hauling extra pounds in the Death Zone is uncomfortable. But very few climbers would trade the discomforts for that extra 3000 feet!
Climb On!
Alan


20 thoughts on “A Look at my Everest 2011 Gear”
This is a great video. Money Alan. This alone is worth a donation to Alzheimer’s research!
Great video Alan as always. You never know Max may jump into your duffel bag for the trip over the Katmandu. Climb On!
Better hide your gear from Max. He might like it a little too much;)
Alan:
Thanks for the video. I can’t tell you how many hours I spend spreading my gear out all over the family room floor and then staring at it trying to consider if I have everything I need. It’s always great to see someone else’s checklist (or video!) for some reassurance that I’ve made good choices. I’m climbing Denali in June and, for the most part, a lot of the gear you discuss for Everest will be similiar for Denali. Thanks again for making the video and gear lists – proper gear selection is probably one of the most disconcerting tasks for many climbers — and I’m certain your assistance is greatly appreciated by many.
Makes me really appreciate what earlier everest climbers;Mallory and Irvin,Hillary and Tensing had to work with.
Leather,hobnailed boots,no down,just many layers of sweaters.Sock hats,regular sunglasses.Hemp ropes.And
if you had oxygen it was bulky,not efficient and probably weighed a ton.Ahhh technology!Still no escalator to the
top though! 🙂
Thanks Bill. It is a bit long but goes by fast. Kind of my collective knowledge of Everest gear after a few times there 🙂 Hopefully worth your time.
Great read Alan. Will watch video when I have some time. I’m sure it is worth the time. Can’t wait to follow your progress in Nepal.
Love the gear discussion, Alan. You got it all nailed down for sure! The video is great. Good luck in the upcoming weeks in terms of training and just staying healthy and injury-free. Kristine & I are very excited for you!
Maybe the ‘Green Hornet’… Btw, I believe you forgot to mention Stage 5: Celebration (party gear is of utmost importance).
Or a frog in the case of my green hoody’
It’s hard not to feel like superhero in a R1 Hoody 🙂
Thanks Mauricio. Kind of a long video but then again, Everest is a long climb! 🙂
Alan, as always you provide great insight into the world of climbing at a language that is easy to understand.
Thanks Eugene! Yes, a 20K “hike” – NOT!
You Will Enjoy lobuche peak view !
Great stuff, what a brilliant thing you are doing, all best Heather
Thank you for your friendship. I will share your page with my UK and other Facebook Friends and donate in due course. All the very best for the trip, you are doing a wonderful thing. All best wishes to you, your family and other supporters. Heather Pearson, Romsey, UK
I uploaded it again and the sound is working now. Thanks.
When I clicked the video, the sound cut off right after “Hey everybody this is Alan”. Maybe its just my computer.
Thanks Ginger, I uploaded it again. Should be working.
Comments are closed.